New Release – Altaro VM Backup Version 7.6

Hi everyone.

Altaro has just released its new VM Backup version 7.6 with some very nice features such as:

Continuous Data Protection (CDP)

With Altaro VM Backup 7.6, users can switch from running daily backups to a continuous data protection model yielding an improved Recovery Point Objective (RPO) of up to 5 minutes.

When CDP is enabled, VMs can be backed up as frequently as every 5 minutes or the maximum frequency permitted by the backup location and environment. This ensures that in a data loss scenario only a few minutes of data would be lost.

This dramatically reduces the Recovery Point Objective (RPO). RPO is the point in time to which VMs are restored by a backup solution in case of a disaster. With CDP in place, users’ RPO is optimized to up to 5 minutes, instead of the hours of data loss faced in cases where users are simply running daily backups.

Grandfather-Father-Son (GFS) Archiving

Altaro VM Backup 7.6 introduces GFS, enabling users to choose to archive the backup versions over and above their continuous and daily backups instead of deleting them (local backups only).

Now you can easily set up separate backup cycles to store a new backup version every week, every month and every year.
Normal Retention Policy:

  • High frequency CDP Backups for 4 hours
  • A maximum of one backup an hour until the Retention Policy ends

With GFS Archiving enabled, Altaro VM Backup also keeps the following backups, with the time periods shown all starting from the time of the last successful backup:

  • 1 backup per week for 12 weeks
  • 1 backup per month for 12 months
  • 1 backup per year for 2 years

CBT v2 for Windows Server 2012 and 2012 R2

CBT refers to Change Block Tracking and allows users to take fast incremental backups without having to scan the entire virtual machine (VM) for changes each time. This can reduce backup duration down from hours to minutes. When CBT is not available, a lengthy full scan for changes is required.

This release addresses an issue in Altaro VM Backup 7 CBT for Windows Server 2012 and 2012 R2 where CBT is disabled and a full scan for changes is required in the following scenarios:

  • Altaro VM Backup or one of the Hyper-V Host agents is updated
  • Altaro VM Backup services or one of the Hyper-V Host agents is restarted
  • A Hyper-V Host is restarted
  • A Virtual Machine on a Failover Cluster migrates between nodes.

Altaro VM Backup 7.6 addresses this and the above scenarios do not require that a full scan is taken.

Concurrent Retention, Restore, Backup and Offsite Copy operations on the same Virtual Machine

In previous Altaro VM Backup Versions only one operation could be performed on a Virtual Machine at the same time. This caused the following pain points for our users:

  • If a retention policy takes hours to complete then backups and restore operations are queued until retention is complete
  • If an Offsite Copy to Azure takes days to complete then backups and restore operations for that VM are queued until the Offsite Copy Operation is complete.
  • If a Restore, File Level Restore or Boot from Backup operation is active then no backups for that Virtual Machine could take place until they are completed.

Each of these limitations have been addressed in v7.6 , allowing users to restore and take Offsite Copies without delaying any backup whether it’s a scheduled backup or a CDP backup.

Each of these limitations have been addressed in v7.6 , allowing users to restore and take Offsite Copies without delaying any backup whether it’s a scheduled Backup or a CDP Backup.

For more information and release notes: https://www.altaro.com/vm-backup/whats-new.php

Leandro.


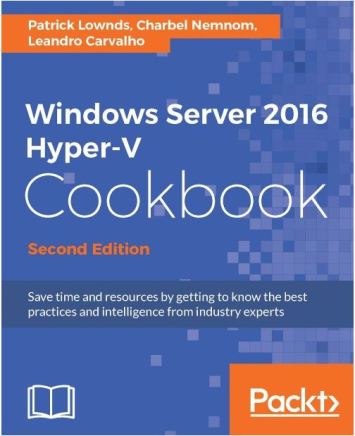
New Book Released – Windows Server 2016 Hyper-V Cookbook

HV2016

Hi everyone.

I released my first book in 2012 and it was a great success for my surprise. I was then invite to help on the updated version for Hyper-V 2016 now written by Charbel Nemnom and Patrick Lownds.

This new release covers almost all features of Windows Server 2016 Hyper-V, including Nano Server, In-Place Upgrade, Shielded VM and much more.

Here is the full list of chapters and topics:

Chapter 1: Installing and Managing Hyper-V in Full, Server Core, and Nano Server

  • Verifying Hyper-V requirements
  • Enabling the Hyper-V role
  • Installing Windows Server 2016, Microsoft Hyper-V Server 2016, and Nano Server
  • Managing a Server Core installation using sconfig
  • Remotely managing a Nano Server installation
  • Managing Nano Server using PowerShell
  • Managing Nano Server using Server Management Tools – SMT
  • Configuring Hyper-V post-installation settings
 
Chapter 2: Migrating and Upgrading Physical and Virtual Servers
  • Performing an in-place upgrade from Windows Server 2012 R2 to Windows Server 2016
  • Exporting and importing virtual machines
  • Migrating virtual machines and updating their Integration Services
  • Migrating virtual machine using Cross Version Shared Nothing Live Migration
  • Migrating virtual machine storage using Storage Migration
  • Converting VHD files to VHDX
  • Upgrading the VM configuration version
  • Converting physical computers to virtual machines
 
 Chapter 3: Managing Disk and Network Settings
  • Creating and adding virtual hard disks
  • Configuring IDE and SCSI controllers
  • Configuring the Storage Quality of Service
  • Configuring and adding Virtual Fibre Channel storage
  • Creating resource pools
  • Enabling and adding NIC teaming
  • Creating and managing virtual switches
  • Using advanced virtual machine network settings
  • Adding and removing vmNICs
 
Chapter 4: Saving Time and Cost with Hyper-V Automation
  • Creating virtual machine templates
  • Learning and utilizing basic commands in PowerShell
  • Using PowerShell commands for daily tasks
  • Enabling and working with remote connection and administration through PowerShell
  • Managing virtual machines with PowerShell Direct
  • Hyper-V management and PowerShell improvements
 
Chapter 5: Hyper-V Best Practices, Tips, and Tricks
  • Using the Hyper-V best practices analyzer
  • Optimizing virtual machines’ resources
  • Enabling nested virtualization
  • Graphics virtualization in Windows Server 2016 Hyper-V
  • Installing and configuring anti-virus for the host and virtual machines
 
Chapter 6: Security and Delegation of Control
  • Configuring Windows Update for Hyper-V
  • Delegating control in Hyper-V
  • Configuring Port ACLs
  • Installing and configuring BitLocker for data protection
  • Configuring Hyper-V auditing
  • Virtual Machine Secure boot
  • VM protection (vTPM)
  • Shielded VM
  • Host Resource Protection
Chapter 7: Configuring High Availability in Hyper-V
  • Installing and configuring block and file storage in Windows Server 2016
  • Installing and configuring the Windows Failover Clustering feature
  • Enabling cluster shared volumes
  • Rolling cluster upgrades
  • Configuring Cluster-Aware Updating for cluster nodes
  • Using Live Migration in a cluster environment
  • Configuring VM Priority for clustered virtual machines
  • VM Load Balancing
  • VM Compute Resiliency
 
Chapter 8: Disaster Recovery for Hyper-V
  • Backing up Hyper-V and VMs using Windows Server Backup
  • Restoring Hyper-V and VMs using Windows Server Backup
  • Configuring Hyper-V Replica between three Hyper-V hosts using HTTP authentication
  • Configuring Hyper-V Replica Broker for a Failover Cluster
  • Configuring Hyper-V Replica to use certificate-based authentication using an Enterprise CA
  • Using checkpoints in VMs
 
Chapter 9: Azure Site Recovery and Azure Backup for Hyper-V
  • Using real-time monitoring tools
  • Using Perfmon for logged monitoring
  • Using VM monitoring
  • Monitoring Hyper-V Replica
  • Using resource metering
  • Tuning your Hyper-V server
  • Using event viewer for Hyper-V troubleshooting

10: Monitoring, Tuning, and Troubleshooting Hyper-V

  • Using real-time monitoring tools
  • Using Perfmon for logged monitoring
  • Using VM monitoring
  • Monitoring Hyper-V Replica
  • Using resource metering
  • Tuning your Hyper-V server
  • Using event viewer for Hyper-V troubleshooting

You can order the book from the publisher website and most of the online bookshops out there.

A special thanks to Patrick and Charbel for all the work they’ve put in the book.

Leandro Carvalho.

Configuring the Virtual Network using Converged Networks

468x60 hyper-v

Networking can be one of the hardest part in a Hyper-V installation, special the physical network. As per Microsoft best practices, a Hyper-V in a cluster environment requires a network card for the cluster network, Live Migration, the management Operating System, CSV and the virtual network used for virtual machines. That would need a server with at least five physical network. In older Windows versions, you would also need a hardware based network teaming. Not mentioning that this would be a “simple” scenario for Hyper-V. Besides the complexity of configuring and managing these networks, it would be quite expensive too.

The first feature in Windows Server 2012 that solved part of the problem was the NIC Teaming, which is now part of the Operating System. Now you do not need to worry about hardware to create a network team. It also supports most of the network adapters out there.

A second feature in Windows Server 2012 allows networks to be “converged” into physical network, called Converged Network.

These two features together brings the solution for all the mess and high prices of virtual networks in Hyper-V deployments.

This recipe will guide you through all the step-by-step to configure the networks for your Hyper-V servers in a cluster using NIC Teaming and Converged Networks.

Getting ready

Our scenario have only two 10GB network cards on each physical server. Make sure you have all hardware and physical components ready.

The network cards and drivers should also be installed in both servers.

In this recipe, each server has two network adapters called NIC01 and NIC02.

How to do it…

The following steps will demonstrate how to create a NIC Teaming with two network adapters and how to create a Converged Network to be used for Live Migration, Management OS, CSV and virtual machines.

1. From one of the servers that will be in the cluster, open Server Manager and click on Local Server.

2. Click on the Disabled link besides NIC Teaming.

3. In the NIC Teaming window, under TEAMS, click TASKS and then New Team, as shown in the following screenshot.

1485EN_02_02

4. In the NIC Teaming window, under Team name, add the name for your team.

5. Under Member adapters, select the network interfaces you want to add into the NIC Teaming.

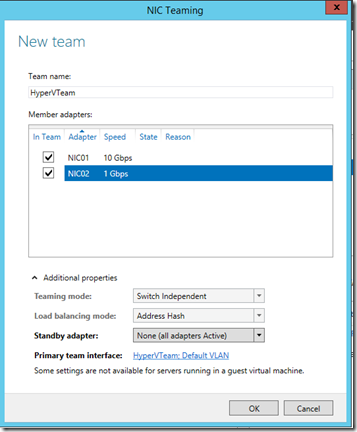
6. Click on Additional properties, make sure Switch Independent and Dynamic are selected, as shown in the screenshot.

1485EN_02_03

Note: Please discard my example above where I had 2 NICs with different speed. This was my lab server with limited resources. Don’t do that at home! =)

7. Once finished, click OK to create your NIC Teaming.

8. Open Windows Powershell and type the following command to create a Virtual Switch called ConvergedHVSwitch using the NIC Teaming HyperVTeam created in step 6 with the bandwidth mode set to Weight.

New-VMSwitch -Name ConvergedHVSwitch -NetAdapterName HyperVTeam -AllowManagementOS $False -MinimumBandwidthMode Weight

9. After creating the Virtual Switch, add the three network adapters called Management, LiveMigration and CSV with the following commands.

Add-VMNetworkAdapter -ManagementOS -Name “Management” -SwitchName “ConvergedHVSwitch”

Add-VMNetworkAdapter -ManagementOS -Name “LiveMigration” -SwitchName “ConvergedHVSwitch”

Add-VMNetworkAdapter -ManagementOS -Name “CSV” -SwitchName “ConvergedHVSwitch”

10. After creating the virtual network adapters, when opening the Network Connections window in the Management OS, you will see the three networks as shown in the following screenshot.

1485EN_02_04

11. Then, run the following commands to set the minimum bandwidth weigh of 40 for LiveMigration, 5 for CSV and 5 for Management.

Set-VMNetworkAdapter -ManagementOS -Name “LiveMigration” -MinimumBandwidthWeight 40

Set-VMNetworkAdapter -ManagementOS -Name “CSV” -MinimumBandwidthWeight 5

Set-VMNetworkAdapter -ManagementOS -Name “Management” -MinimumBandwidthWeight 5

12. Use the command New-NetIPAddress and Set-DnsClientServerAddress to add the IP, subnet, default gateway and DNS client using the following commands as example.

New-NetIPAddress -InterfaceAlias “vEthernet (Management)” -IPAddress 192.168.1.1 -PrefixLength “24” -DefaultGateway 192.168.1.254

Set-DnsClientServerAddress -InterfaceAlias “vEthernet (Management)” -ServerAddresses 192.168.1.250

13. Run the New-NetIPAddress to add the IP settings to the LiveMigration and CSV network.

14. Repeat steps 1 to 13 in the other server that will be member of the cluster.

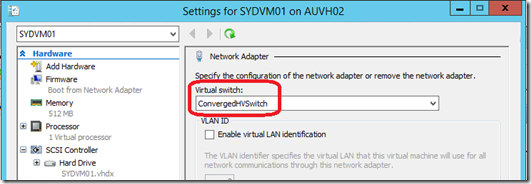
15. For every virtual machine, you can now use the virtual switch created in step 8 called ConvergedHVSwitch.

1485EN_02_05

How it works…

For everyone who has created a cluster in Hyper-V in Windows Server 2008 knows that networking is one of the most complicated and sometime expensive settings during a cluster configuration. In a normal scenario, you would have a network interface or a NIC Teaming for the Management OS, CSV, Live Migration and the virtual machines. For high availability with a NIC Teaming for each network, we would have at least eight network adapters.

Thankfully, Windows Server 2012 introduced two features that help you to simplify the networking in a cluster, which are NIC Teaming and Converged Network.

NIC Teaming provides Load Balancing/Failover or LBFO and network aggregation with up to 32 network interfaces using Windows Server 2012, which means you are not dependent of any hardware nor extra costs.

When creating a NIC Teaming in Windows, there are three Teaming modes:

Switch-Independent teaming: This is the most common teaming used, as it doesn’t require the switch that the network adapters are connected to participate in the teaming. This option, which was used in the recipe, can be beneficial when the network adapters are connected into different switches.

Generic or Static Teaming: This option requires both switch and the team to have the same configuration, which is normally supported by server-class switches.

Link Aggregation Control Protocol Teaming or LACP: This option also requires both switch and the team to have the configuration, but it uses a dedicated protocol to identify the links dynamically.

In Windows, there are also three different load balancing mode:

Hyper-V switch port: This option associates a team member to a virtual network adapter using round robin. That said the virtual machine will use the same team member every time it is started. This option would be interesting for large environments and when using Virtual Machine Queues – VMQ as a queue can be in a specific NIC where the traffic is expected.

Address Hashing: This option can be used for TCP and UPD traffic only, which creates a hash and then assign packets with hash value to the available adapter.

Dynamic: Added in Windows Server 2012 R2, the Dynamic algorithm distribute outbound loads on a hash in real time between team members and it also distribute the inbound loads through the Hyper-V port, bringing the best of the two other options together.

The other feature of Windows Server 2012 is Converged Network, which creates a virtual network with virtual network adapters that can be used for different services, such as CSV, Live Migration and the Management OS.

Converged Network is the name given when a virtual switch is created and virtual network adapters are added to it. Then Quality of Service – QoS policies are assigned to each virtual network adapter added to the switch so that you can control how much of the physical network can be used per each virtual network. To make it easier, our scenario had a server with a NIC Teaming that was added to a virtual switch with three virtual network adapters: Management OS using 5% of the bandwidth, CSV with 5% and Live Migration using the other 40%. The remaining 50% would be used by virtual machines.

Converged Networks can be created using PowerShell only and when creating the virtual switch you can use the bandwidth setting as weight or absolute. Weight assigns each virtual network adapter to a share of the available bandwidth. Absolute requires the bandwidth to be specified in bits per second, making this option not as simple as weight.

In this recipe, you have seen how you can use NIC Teaming and Converged Networks to simplify and save costs when configuring the network of your Hyper-V Cluster.

Creating a NIC Teaming using a PowerShell Command Line

The recipe showed how to create a NIC teaming using the graphical interface. Using New-LBFOTeam can help you to create the same NIC Teaming used in this recipe with a simple and small command line.

New-NetLBFOTeam –Name HyperVTeam –TeamMembers NIC01,NIC02 –TeamingMode SwitchIndependent –LoadBalancingAlgorithm Dynamic

Automating the NIC Teaming and Converged Network creation with a PowerShell Script

As demonstrated during the recipe, a couple of commands were used to configure the Converged Network. To help you to automate the process in all other servers that will be member of the cluster, copy the following command to a PowerShell PS1 file and run on each server. Make sure you change the IP addresses for each virtual network adapter based on your needs.

#Create a NIC Team with the network interfaces NIC01 and NIC02 using the teaming mode Switch Independent and the Load Balancing Algorithm set as Dynamic

New-NetLBFOTeam –Name HyperVTeam –TeamMembers NIC01,NIC02 –TeamingMode SwitchIndependent –LoadBalancingAlgorithm Dynamic

#Create a virtual switch called ConvergedHVSwitch using the NIC team created in the previous command and with the bandwidth mode set as weight

New-VMSwitch -Name ConvergedHVSwitch -NetAdapterName HyperVTeam -AllowManagementOS $False -MinimumBandwidthMode Weight

#Commands to create 3 virtual network adapters called Management, LiveMigration and CSV using the virtual switch created in the previous command

Add-VMNetworkAdapter -ManagementOS -Name “Management” -SwitchName “ConvergedHVSwitch”

Add-VMNetworkAdapter -ManagementOS -Name “LiveMigration” -SwitchName “ConvergedHVSwitch”

Add-VMNetworkAdapter -ManagementOS -Name “CSV” -SwitchName “ConvergedHVSwitch”

#Commands to set the Live Migration NIC bandwidth weight of 40, CSV with 5 and Management with 5 as well

Set-VMNetworkAdapter -ManagementOS -Name “LiveMigration” -MinimumBandwidthWeight 40

Set-VMNetworkAdapter -ManagementOS -Name “CSV” -MinimumBandwidthWeight 5

Set-VMNetworkAdapter -ManagementOS -Name “Management” -MinimumBandwidthWeight 5

#Commands to configure IP addresses for the network used by the Management OS (requires different IPs per server)

New-NetIPAddress -InterfaceAlias “vEthernet (Management)” -IPAddress 192.168.1.1 -PrefixLength “24” -DefaultGateway 192.168.1.254

Set-DnsClientServerAddress -InterfaceAlias “vEthernet (Management)” -ServerAddresses 192.168.1.250

#Commands to configure IP addresses for the CSV and LiveMigration networks (requires different IPs per server)

New-NetIPAddress -InterfaceAlias “vEthernet (CSV)” -IPAddress 192.168.1.2 -PrefixLength “24” -DefaultGateway 192.168.1.254

New-NetIPAddress -InterfaceAlias “vEthernet (LiveMigration)” -IPAddress 192.168.1.3 -PrefixLength “24” -DefaultGateway 192.168.1.254

Creating and Extending a Hyper-V Replica in Windows Server 2012 R2

468x60 hyper-v

Disaster Recovery (DR) is a very important component for every IT System. To build a good and acceptable DR infrastructure normally involves datacentres, servers, storage, network bandwidth and all other expensive solutions. All these factors can make a DR plan more complicated for small and medium size companies. The high cost and complexity would make it very difficult to be accomplished.

Hyper- V on Windows Server 2012 R2 comes with a great and improved feature to solve this problem called Hyper-V Replica. It allows virtual machines to be replicated to another server, such a remote disaster recovery site server, using a single network connection.

The Hyper-V Replica components consist of a Primary Server, which host all virtual machines running in production, and the Replica Server, hosting all replica virtual machines from the primary server. It allows administrators to automatically replicate virtual machines to be used in case of a planned failover, like moving VMs to the replication site, or even a failover in unplanned events where the primary server is offline. Windows Server 2012 R2 introduces another option to create an extended replication of your Hyper-V Replica scenario, where you can add a third replication server to your Replica Server and extend the replication to another location or even a cloud provider.

Hyper-V Replica replication engine has a module called Change Tracking that captures every writes within the virtual hard drive file of all running virtual machine and creates a log file. The replication happens in the Virtual Hard Disk (VHD) level, making it even easier and allowing any virtual machine to be replicated. The replication using these logs occurs periodically and asynchronously through a HTTP or HTTPS connection. Windows Server 2012 R2 also brought the option to change the replication frequency, which was 15 minutes previously, but now allows you to select between 30 seconds, 5 minutes and 15 minutes. All the data that must be replicated to the Replica Server uses the Network Module, which optimizes the workload to work in slow network connections like WANs. Basically you will need two physical servers running Hyper-V and a network connection between then. That’s all. It doesn’t need any third party hardware or software. It also has the option to create recovery points so that you can restore virtual machines to a point in time. You don’t have to worry about database corruption or virus replication for example using the Recovery Points, which creates up to 24 points that can be recovered in any point in time from the last 24 replications in the replica server.

Hyper-V Replica is designed to allow small and medium size companies to have a full disaster recovery infrastructure solution for virtualized environment with small costs and components.

Even allowing you to have replicas on the same network, the idea of Hyper-V Replica is to have a replica in a different network where you can run your VMs in case of a disaster, making it fully compliant with almost all disaster recovery policies in place today.

In this recipe you will see how to create a single Hyper-V Replica infrastructure with a primary and recovery server using HTTP based replication.

How to do it…

In the following tasks you will see how to prepare and configure two servers to work with Hyper-V Replica and how to enable replication to a virtual machine. The tasks will illustrate how to set up the Primary Server (HVHost01), the Replica Server (HVHost02) and the server that will be used to extend the replica (HVHost03). At the end of the tasks you will also see how to failover the virtual machine in the replica server in case of disaster.

1. Open the Hyper-V Manager on the server that will be used as Replica Server.

2. In the Hyper-V Manager, click on Hyper-V Settings in the right pane.

3. In the Hyper-V Settings window, select Replication Configuration.

4. Click on Enable this computer as a Replica server.

5. Under Authentication and ports, select Use Kerberos (HTTP) and specify the port to be used.

6. Under Authorization and storage, select Allow replication from any authenticated server and specify the default location to store replica files or Allow replication from the specified servers. If you select the last option, specify the Primary Server, Storage Location and Trust Group.

7. In the following screenshot the port 80 was used to replicate using HTTP. The Primary server *.contoso.com was added to allow replication from any server from the contoso.com domain and a trust group called HVServers was also created. Click OK when finished.

1485EN_02_12

8. When clicking OK, you will see a window to create the Windows Firewall exemption to allow Hyper-V Replica. Click OK to confirm. To configure it manually, open PowerShell from the Taskbar and type the following command.

Enable-Netfirewallrule -displayname “Hyper-V Replica HTTP Listener (TCP-In)”

9. Repeat the steps 1 to 8 in the Primary Server and the server used to extend your replica too.

10. Now with the Replica Server up and running, right click on the virtual machine you want to replicate in the Primary server in the Hyper-V Manager and select Enable Replication.

11. In the Enable Replication Wizard, click Next.

12. In the Specify Replica Server, type the Hyper-V Replica server name in Replica Server and click Next.

13. In Specify Connections Parameters, verify that Use Kerberos authentication (HTTP) is selected. In case of slow network connections, verify that the checkbox Compress the data that is transmitted over the network is selected as shown in the following screenshot and click Next.

1485EN_02_13

14. Under Choose Replication VHDs, select the virtual hard disks file that you want to replicate and click Next.

15. In Configure Replication Frequency, select the time you want to replicate your virtual machines to the replica server. The options are 30 seconds, 5 minutes and 15 minutes. After selecting the option, click Next.

16. In Configure Additional Recovery Points, leave the option Maintain only the latest recovery point to have only the last recovery point in the replica server, as shown in the next screenshot, or select Create additional hourly recovery points to allow the replica server to receive additional recovery points per hour. If you select Create additional hourly recovery points, specify the number of recovery points in Coverage provided by additional recovery points (in hours). To specify the recovery points frequency, select the checkbox Volume Shadow Copy Services (VSS) snapshots frequency (in hours): and use the slider to specify the frequency the snapshots are taken.
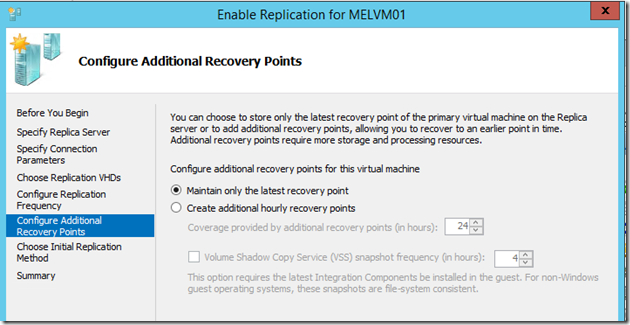
1485EN_02_14

17. In the Choose Initial Replication Method window, under Initial Replication Method, select Send initial copy over the network, as shown in the next screenshot, to use the network connection to copy the VM files, Send initial copy using external media to export the VM data and import locally in the replica server or Use an existing virtual machine on the Replica server as the initial copy in case you have a restored copy of the virtual machine on the replica server.

18. Under Schedule Initial Replication, select Start replication immediately, as shown in the following screenshot, to send the virtual machine data straight away after the wizard or select Start replication on, the time and date for scheduled replication to schedule the initial replication and click Next.

1485EN_02_15

19. In Completing the Enable Replication wizard, check the settings and click Finish. The virtual machine data will be transferred to the replica server in the scheduled time and date.

20. Although this is optional, if you want to extend the replication from the Replica Server to a third server, open the Replica Server, right click on the virtual machine you want to replicate, click on Replication and select Extend Replication.

21. In the Before you Begin page, click Next.

22. In Specify Replica Server, type the server name you want to use to extend the replication and click Next.

23. In Specify Connection Parameters, select User Kerberos authentication (HTTP) and click Next.

24. In the Configure Replication Frequency, select the frequency you want to replicate and click Next.

25. In Configure Additional Recovery Points, select the option you prefer and click Next.

26. In Choose Initial Replication Method, select between Send initial copy over the network , Send initial copy using external media or Use an existing virtual machine on the Replica server as the initial copy.

27. Under Schedule Initial Replication, select between Start replication immediately or Start replication on and click Next.

28. In the Completing the Extended Replication wizard, verify the options and click Finish.

29. Wait until the replication is finished. To check if the replication is health, right click on the virtual machine, select Replication and click View Replication Health.

30. After completing the steps above your Hyper-V Replica environment will be up and running, replicating the VM data across the DR server and then to the extended server. In case of a disaster and the primary server is offline, right click on the virtual machine in the replica server, select Replica and click on Failover.

31. In the Failover window, select the recovery point to use in the dropdown list and click Fail Over, as shown in the following screenshot.

1485EN_02_17

How it works…

Hyper-V Replica needs two servers to replicate the virtual machine data and can also use a third server now in Windows Server 2012 R2  to extend the existing replica from the Replica Server. The principal server, which contains the running virtual machines, is known as Primary Server, the secondary server, called Replica Server, gets the replication from the primary server and the optional server used to extend the replica from the Replica Server.

It’s important to mention that you cannot extend the replica from the Primary Server to another server when using Hyper-V replica, but only from the Replica Server.

During the replica configuration, the first thing is to enable the Replica Server in Hyper-V Settings. The settings are divided in two classes: authentication and authorization. In authentication, there are two options to transfer the virtual machine files over the network: HTTP, which doesn’t encrypt the data and doesn’t require any additional configuration and HTTPS, which encrypts the content using digital certificates for authentication. You must request and install a certificate to use certificate based authentication in order to select HTTPS. This option requires a certificate to be installed in both servers prior the replica configuration.

The replica server also needs to be configured to receive data from other servers. That’s the role of the authorization part of the window. You can select the option to Allow replication from any authenticated server or specify a list of servers and the path to store the virtual machine files. In the server list you can also use wildcards like *.contoso.com to allow any server from the contoso.com domain to replicate data to the server. You can use Trusted Groups to separate different areas or customers, creating a sort of tagging. This is an interesting option in case you have different customers and want to make sure their data will be in different locations.

Although the primary server doesn’t need these replica server options, would be a best practice to also enable it in the primary servers so that you can use the Planned Failover feature and transfer the VM back to the primary server after an outage.

Then a firewall exception must be configured to allow Windows Firewall to receive the HTTP requests from the primary server. If you configured the primary server as a replica server you also must run the PowerShell command.

That’s basically all you need to setup the hosts computers with Hyper-V Replica. The next step is to enable the replication on the virtual machines you want. This is done by selecting the option Enable Replication on the VM.

The first thing during the wizard is to select the replica server. After that you can select the protocol to send the VM files. You can use either HTTP or HTTPS. On the same screen you can uncheck the option to compress the data over the network. Because the primary and replica servers are intended to run in different sites, this checkbox is enabled by default. The next option is to select the VHD that need to be replicated. In case the VM has more than one VHD you can select which one will be present in the replica server. Then you can choose in what frequency you want to replicate the virtual machine. In the Configure Additional Recovery Points window you can choose to have only the last recovery point of a VM or additional ones. You can select the number and the interval to create the additional recovery points, which can be up to 24. The last step is to select the initial replication method and schedule. The default method is to send the initial copy over the network. In case of large virtual machines over slow networks, you can export the VM data to an external media and import in the replica server. In case the VM you want to replicate already exist in the replica server, you can use it for the initial copy. Then you can start the replication immediately or schedule the initial replication. It is important to say that the schedule is only applicable during the initial replication. The log replication occurs every five minutes and cannot be changed.

When a virtual machine is enabled to replicate the Hyper-V Replica modules start to monitor the changes in the VHD and create a log to be replicated. This is done by the Change Tracking module in the Hyper-V Virtual Storage Stack. The replication starts using an asynchronous method, replaying the log files in reverse order.

When adding the extended replication to a third server, you will face almost the same options when configuring a normal replica. The only difference is that you will not be able to select which VHD files will be replicated. This is inherited from the Replica Server.

And then the unexpected: a disaster occurs. No need to panic. The failover process is manual. To do so you must select the virtual machine and fail it over. You can also select which recovery point to restore the VM. It comes very handy if you have a virus infection in one of your virtual machine, for example.

As a last tip, it is recommended to monitor the replica health using the default views and tools to make sure you will be able to restore a recent version of your virtual machines in case of failure.

There’s more…

You might be wondering what happen with a virtual machine with a static IP address that fails over on another datacenter with a different subnet and network configuration. For example, on datacenter A, where the primary server sits, you have a VM with IP address, default gateway, DNS settings, etc. On datacenter B, where the replica server is, there are different network configurations, causing problems on all VM that failover to access the network.

When the VM starts on the replica server it will lose the network settings. Even if you keep the same network configuration it will not work because the VM is running on a different network.

That’s why Hyper-V allows you to add failover network configuration settings, which can be used when you failover it to the replica server.

To configure these settings, open the virtual machine settings, expand the attached network adapter and click on Failover TCP/IP, as shown in next screenshot.
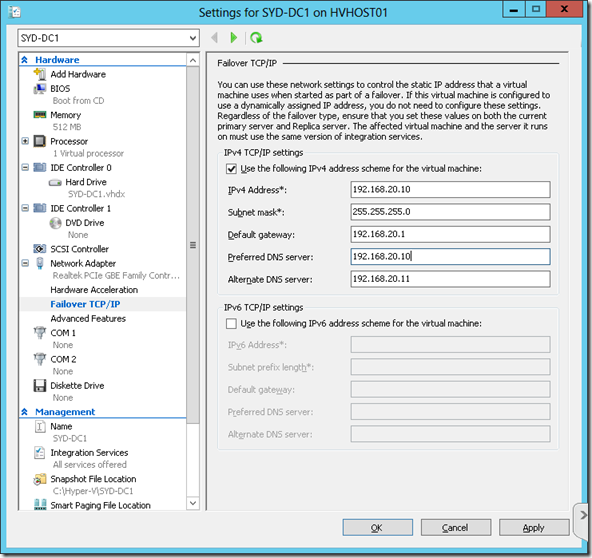
1485EN_02_18

Select the checkbox Use the following IPv4 address scheme for the virtual machine and add the network configuration that you want your VM to use when it fails over the other network.

Using PowerShell to Configure and Enable Hyper-V Replica

PowerShell is also present as a secondary configuration option for Hyper-V Replica and sometimes it becomes very handy and easier, as shown in the next examples.

You can use the command Set-VMReplicationServer to configure your server as a replica server. The next example shows a server being enabled using Kerberos as authentication type, with the default storage location point to C:\Hyper-V and with the option to receive replication from any server enabled.

Set-VMReplicationServer -ReplicationEnabled $true -AllowedAuthenticationType Kerberos -DefaultStorageLocation C:\Hyper-V -ReplicationAllowedFromAnyServer $true


To enable replication to a VM you can use the command Enable-VMReplication. The next example shows how to enable replication to all virtual machine at the same time using port 80 on server HVHost02.

Enable-VMReplication -VMName * -ReplicaServerName HVHost02 -ReplicaServerPort 80 -AuthenticationType Kerberos


The Start-VMInitialReplication command starts the initial replication for your virtual machines. The next example shows how to start it on every virtual machine.

Start-VMInitialReplication –VMName *


To list all Hyper-V Replica commandlets on PowerShell, type the following command.

Get-Command -Module Hyper-V *Replica*

Leandro Carvalho
My Blog | Technet Wiki Articles | MVP Profile
Twitter: LeandroEduardo | LinkedIn: Leandroesc

Migrating Your Virtual Machines to Windows Server 2012 R2 Hyper-V

468x60 hyper-v

And then comes the time to migrate your old servers with Windows Server 2012 to Windows Server 2012 R2 Hyper-V with all the joys and headaches of upgrading your old servers. In most environments nowadays, the only physical servers are the virtualization hosts, which makes the migration very important. Microsoft made the migration much easier in the new Hyper-V version, where we can simply move virtual machines from a Windows Server 2012 host to a Windows Server 2012 R2, without any downtime and as simple as a normal Live Migration of virtual machines. Actually, that’s how the migration can be done, by simple doing a Shared Nothing Live Migration in your virtual machines to the new host.

There are other options to migrate VMs in offline mode by exporting them. Another interesting feature available in Windows Server 2012 R2 is the option to export a running VM. Given the VM is still running during the exporting process and being changed, this is not an option for migration, but it’s perfect if you want to duplicate your virtual servers or troubleshoot a problem.

In this recipe you will see how to migrate your virtual machines without downtime to a new Windows Server 2012 R2 using Live Migration and the offline migration exporting VMs to the new server.

To migrate your virtual machines using Shared Nothing Live Migration, make sure the source and destination servers are on the same network. You will also improve the migration if you create a dedicated network to be used for migrations only.

To export and import your virtual machines, you will need available storage on the local server or a shared folder on the network.

You will now see how to migrate a virtual machine using Shared Nothing Live Migration from Windows Server 2012 to Windows Server 2012 R2 and how to export and import a virtual machine.

1. To enable Live Migrations on the destination server with Windows Server 2012 R2, open Hyper-V Manager and click on Hyper-V Settings on the right column.

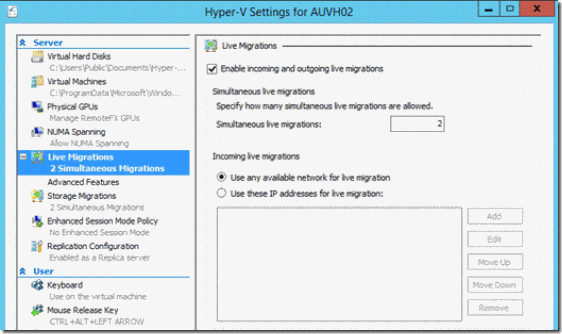
2. In Hyper-V Settings, click on Live Migrations and select the Enable incoming and outgoing live migrations checkbox.

3. Under Simultaneous live migrations, specify the number of concurrent live migrations that will be allowed.

4. In Incoming live migrations, specify a particular network for live migration by selecting Use these IP addresses for live migration or select Use any available network for live migration to use any local network adapter available to move the VMs. The following screenshot shows an example of the existing options described in the previous steps. When finished, click OK.

clip_image002

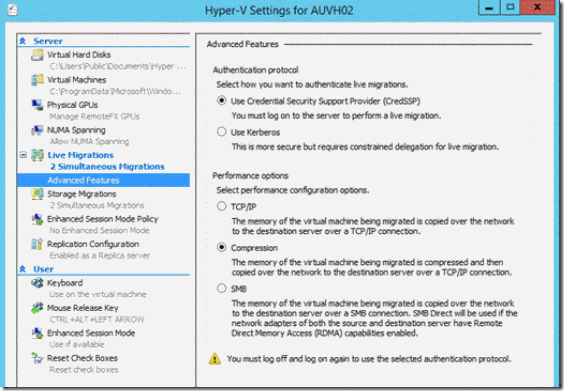
5. Expand Live Migrations in the left pane and click on Advanced Features.

6. Under Authentication protocol, select Use Credential Security Support Provider (CredSSP) or Use Kerberos.

7. Under Performance options, select between TCP/IP, Compression or SMB and click OK, as shown in the next screenshot.

clip_image004

8.  To move your virtual machine using Shared Nothing Live Migration, from the Windows Server 2012 host, open Hyper-V Manager, right click on the VM you want to move and select Move.

9. In the Before You Begin page, click on Next.

10. In the Choose Move Type window, select Move the Virtual Machine, as shown in the following screenshot and click Next.

clip_image006

11. In Specify Destination Computer, type the Windows Server 2012 R2 host that you want to move your VM and click Next.

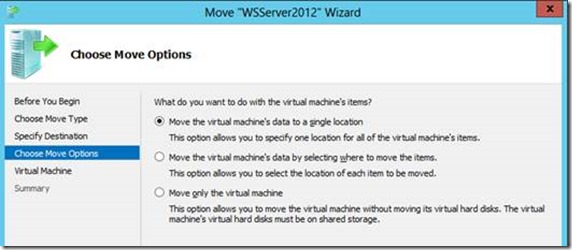
12. In Choose Move Options, select Move the virtual machine’s data to a single location to move all configuration files and virtual disks to the same location, Move the virtual machine’s data by selecting where to move the items to select the location of each item to be moved or Move only the virtual machine to move the VM only and keep the VHD files on the same location and click Next, as shown in the following screenshot.

clip_image008

13. In Choose a new location for virtual machine, select the destination folder where the VM will be moved and click Next.

14. In the Summary page, verify the selected options and click Finish to start the moving process. Wait until the completion and check the virtual machine on the destination host.

15. The other option to migrate VMs is the Export feature. To export a virtual machine to another server, open the Start screen, and select Hyper-V Manager.

16. Select the virtual machines you want to export, right click on them, and select Export, as you can see in the following screenshot:

clip_image010

17. In the Export Virtual Machine window, enter the path you want to export the virtual machines to and click on Export.

18. Copy the exported virtual machine files to the destination host.

Note: You can also import and export VMs using the PowerShell commands Import-VM and Export-VM respectively. For more information, open PowerShell and type Help Import-VM for import and Help Export-VM for export.

19. Open Hyper-V Manager on the destination host and select Import Virtual Machine from the right pane.

20. In the Before You Begin screen click on Next.

21. In the Locate Folder screen, specify the folder with the virtual machine files you want to import and click Next.

22. In the Select Virtual Machine window, select the virtual machines to be imported and click Next.

23. In the Choose Import Type window, select the type of import, as shown in the next screenshot, and click Next.

clip_image012

24. If the source virtual machine has different virtual switches attached to it or different configuration that the destination host will not support, new windows can be displayed asking you to address the problem. The next screenshot shows an example of a VM with a different virtual switch name. Address all problems or conflicts that the VM may have and click Next.

clip_image014

25. If prompted, specify the folders to store the virtual machine files and disks and click Next.

26. Click on Finish when it is done and you will see the imported virtual machine in the Hyper-V console.

As described during the steps, there are two options to migrate your virtual machines to a new server. The first one, which is using Shared Nothing Live Migration, allows you to move your VM without any downtime, but it requires the source host to be Windows Server 2012. With the second option, you can move VMs from any Hyper-V version, but it’s an offline method.

Starting with the Export/Import option, the process to export the Virtual Machine collects its entire configuration file, snapshots, the Virtual Hard Drive and puts all of them together within a new folder with the virtual machine name in the specified path during the export process. It’s also possible to select more than one virtual machine and export in just one go in case you are migrating from old Hyper-V versions.

Note: Since Windows Server 2012 a VM can be imported without requiring the export process. You can copy all the virtual machine files to a new host and during the importation, you just need to select the VM configuration file (xml) and continue the steps as shown above.

Windows Server 2012 R2 also introduces a new option to export VMs that are running, but this option is not recommended for migration purpose, given the VM is still being updated during the export process, however it’s very handy to copy your VMs into a lab or just for troubleshooting.

During the wizard, you specify the folders where the virtual machine files sit. It doesn’t matter if the virtual machines were exported or not. You can simply copy and paste the VM files and the result will be the same.

After that, the wizard shows a list of virtual machines you want to import. The good news here is that Hyper-V list the VMs per name and not using the Global Unique Identifier (GUID) as previous versions. It makes the process even easier.

The wizard provides three different types of import. The first one Register the virtual machine in-place (use the existing unique ID) assumes that all files of the imported VM are in a single place and just register the VM. It can be used to register VMs in a new host using the same VM path. The second one, Restore the virtual machine (use the existing unique ID) is almost the same as the previous option, but it allows you to specify the VM files path and it copy the files to the new destination path. The last option Copy the virtual machine (create a new unique ID) create new VMs with new IDs and can be very helpful when you just want to use the VM files as a template to create new VMs.

Another problem from previous versions of Hyper-V is when the VM has different configurations in the source host. For example, if the VM has a different virtual switch or a hardware setting that is not present in the destination host the import process would fail. Now the import is clever enough to identify whether the VM has conflicted or different settings. Memory, processor, disk, networks and file paths are checked and in case of problems the wizard will prompt you to changed based on the destination limits and configuration.

When finished, your virtual machine will be ready to be started on the new server, making your migration much simpler.

The first option used in this recipe was Shared Nothing Live Migration that has an easy and intuitive wizard to move your VMs across your host servers. Although the article described how to move a VM from a single host with Windows Server 2012 to a new host with Windows Server 2012 R2, you can still do the same process within a cluster as well.

Different of Storage Migration, by default live migrations are disabled on Hyper-V. To enable it you must specify some options such as authentication protocol, simultaneous live migration and incoming live migration.

The first configuration, authentication protocol, let you choose two options to specify the way Hyper-V will authenticate to start the live migrations. By selecting Credential Security Support Provider (CredSSP) you can live migrate virtual machines only if you are logged on to the source computer to start it so that CredSSP can be used to authenticate the migration. This option doesn’t require any pre-requisites, but you will not be allowed to perform a live migration using other remote management tools like Hyper-V Manager from another server or PowerShell sessions. The migration will be initiated only when you are logged on the source server.

If you also want to start live migrations using these remote management tools you can select to use Kerberos for authentication. When starting a live migration, either locally on the server or remotely, a constrained delegation will be used to authenticate and start the migration. This is the best option due the flexibility to start the migration also from remote tools, but it requires pre-configuration in Active Directory. Kerberos authentication will be demonstrated at the end of the article.

The next option provides a field to specify the number of simultaneous live migrations that Hyper-V will support. In this option the only limit is the hardware and the network connection between the servers.

The Incoming live migrations option allows you to configure which network will be used for live migrations. For better performance and resilience is recommended to use a specific network for live migration, but if you have only one network adapter on the host computer or doesn’t have a particular adapter for live migration you can also use any available network. After enabling live migrations and setting up these three options you are ready to move your VMs.

Under Performance options, there are three new options available. TCP/IP will move the VM memory over a TCP/IP Connection, Compression can compress the VM memory before copying the VM to the new server using TCP/IP connection and SMB copies the VM memory through a SMB connection, which can use Remote Direct memory Access (RDMA) if both servers support it.

The wizard is launched with a simple right click on the VM. Shared Nothing Live Migration and Storage Migration use the same wizard, which improves the user experience and reduce the number of windows and options on Hyper-V. The first window, Choose Move Type, has the Shared Nothing Live Migration option (Move the virtual Machine) and the Storage Migration option (Move the virtual machine’s storage). After selecting to move the VM and specifying the destination server where the VM will be moved, you can select one of the three move options to move VMs to a single location, select different locations per VM item or move only the VM. The option to move only the VM works when you are storing the VM in a shared folder on the network or any other type of shared storage.

When the migration starts, Hyper-V authenticates the connection on the destination host and starts the process by migrating the VM disks. After moving all disk data, it migrates the virtual machine memory.

When finished, your VM will be up and running on the destination host and all the migration process happens with no downtime.

Enabling Live Migration and Migrating VMs using PowerShell

The PowerShell commandlet to move a VM can be considered one of the easiest one on Hyper-V due all process that happens with just one line of command. The whole configuration and migration process described in this article can be automated using PowerShell.

To enable live migrations of virtual machines, type the following command line:

Enable-VMMigration | Set-VMMigrationNetwork Any | Set-VMHost –VirtualMachineMigrationAuthenticationType CredSSP

You can also change the migration network from any to a specific network by adding the IP address or the authentication type by changing CredSSP to Kerberos.

After enabled, to move VMs, type the following commandlet. On this example, a VM called SYD-FS1 will be moved to de server HVHost02 and the storage will be located on D:\Hyper-V. For more information about Move-VM, type Help Move-VM.

Move-VM SYD-FS1 HVHost02 –IncludeStorage –DestinationStoragePath D:\Hyper-V\

Configure Constrained Delegation to Authenticate Live Migrations

Constrained delegation allows live migrations to be started using any remote management tool and might help, providing more flexibility to move your VMs.

To enable it, open Active Directory Users and Computers from one of the Domain Controllers where the host servers sit, right click on the host computer account and click Properties. In the Properties window, click on the Delegation tab, select Trust this computer for delegation to the specified services only and select Use Kerberos, as shown in the next screenshot.

Click Add and then Users or Computers. In the Select Users or Computers box, type the destination host server name and click OK.

In the Add Services dialog box, select cifs and Microsoft Virtual System Migration Service and click OK. The two services will be listed in the service type as shown in the next screenshot as well.

clip_image016

Click Ok to close the computer properties window and repeat the same process on the destination server computer account.

After that you can change the live migration authentication type to use Kerberos.

That’s all guys, hope this help in some way.

Leandro Carvalho
My Blog | Technet Wiki Articles | MVP Profile
Twitter: LeandroEduardo | LinkedIn: Leandroesc

Optimizing Hyper-V with Generation 2 Virtual Machines

Since the first Microsoft virtualization software called Virtual PC, followed by Virtual Server and then Hyper-V, the virtual machine used by them has been almost the same, with some improvements and features here and there, but keeping the old virtualized hardware, an Intel 440BX chipset.

Windows Server 2012 R2 introduces Generation 2 Virtual Machines with new features and possibilities that were not available in the previous generation.

This new type of virtual machine changes the way we create, configure and manage our virtual servers in Hyper-V. Some of these features include the replacement of BIOS with UEFI, boot from SCSIs, removal of legacy drivers, secure boot and so on.

With new architecture and removal of some legacy features, Generation 2 VMs also have some limitations that can restrict its usage in production so before starting using these new VMs, it is important to understand the differences and limitations of each generation.

In this article you will see how to create, configure and verify Generation 2 Virtual Machines.

Getting ready

Generation 2 Virtual Machines are available right after the Hyper-V installation so you just need your Hyper-V Server installed and ready to create new VMs.

How to do it…

The next steps will guide you through how to create, check and configure Generation 2 Virtual Machines.

1. To create a new Generation 2 Virtual Machine, open Hyper-V Manager, under the Action pane click on New and select Virtual Machine.

2. In the New Virtual Machine Wizard, click Next.

3. In Specify Name and Location, type the virtual machine name, location and click Next.

4. In Specify Generation, select Generation 2, as shown in the next screenshot, and click Next.

1485EN_02_06

5. In Assign Memory, specify the Startup memory and if you want to enable Dynamic Memory, click on Use Dynamic Memory for this virtual machine and click Next

6. In Configure Networking, select the network connection in the dropdown list and click Next.

7. In Connect Virtual hard Disk, specify the Name, Location and Size of your new hard disk. You can also use an existing virtual hard disk or skip this option to attach a virtual hard disk later.

8. In Installation Options, select the preferable installation option, click Next and then Finish.

Note: You can also create a new Generation two virtual machine using the command New-VM -VMName VM02 -Generation 2. If the generation option is not specified, Hyper-V will create a Generation 1 VM by default.

9. To verify all virtual machines and their generation version, type the following PowerShell command:

Get-VM | fl Name,Generation

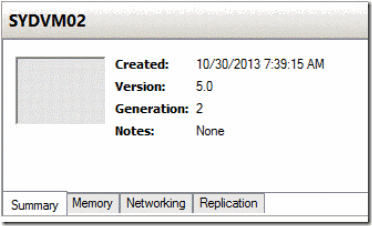
10. To check the virtual machine Generation using the graphical interface, select the virtual machine in Hyper-V Manager and click on the Summary tab in the bottom of the console, as shown in the next screenshot.

clip_image004

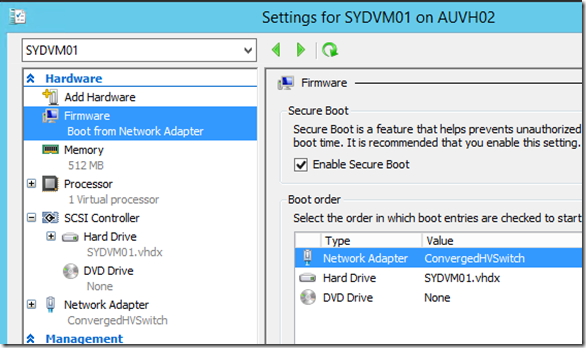
11. To set the new Firmware feature options in a Generation 2 Virtual Machine, right click on the VM and select Settings.

12. In the Settings window, click on Firmware, as shown in the following screenshot.

1485EN_02_08

13. By default, Secure Boot is already enabled. To disable it, unmark the check box Enable Secure Boot.

Note: Microsoft recommends Secure Boot to be enabled whenever possible. It should be disabled only when a secure book scenario is not supported.

14. To change the book order, select the device under Boot order and click Move Up or Move Down to get the desired order.

15. To add a device on top of the boot order list using PowerShell, type the following command.

$vm = get-vm “VMName”
$dvd = Get-VMDvdDrive $vm
Set-VMFirmware $vm -FirstBootDevice $dvd

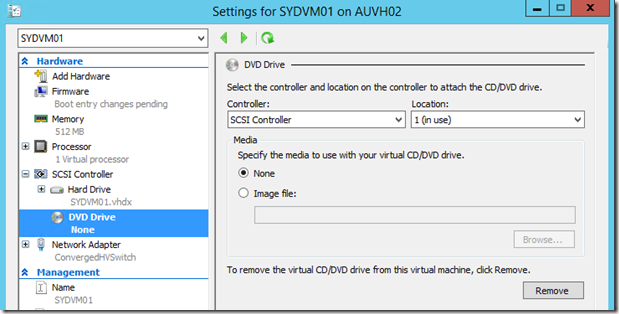
16. By default, Generation 2 VMs do not have DVD drivers. To add a new driver, click on SCSI Controller, select DVD Drive and click Add. The next screenshot shows a new DVD Drive added. To change the Controller and Locations, use the menus under DVD Drive. To select a DVD image, click on Image file and specify the image location.

1485EN_02_09

17. When finished, click OK and your Generation 2 VM will be ready for use.

How it works…

Generation 2 Virtual Machines were introduced in Windows Server 2012 with massive changes in their structure since the Hyper-V first release. There were VM improvements and features added in previous versions before but this is the first time that the whole virtual machine was changed.

As the previous generation had some limitations, the idea of this new model is to provide new features and prepare new improvements for future releases. To make it possible, some features were removed and as result, there are some limitations.

One of the most interesting feature that opened great functionalities was the replacement of the old BIOS system to a new boot system using UEFI firmware, which uses a high-level language that is easy to be extended. Some features that were possible with UEFI are Secure Boot, larger boot volumes, GPT boot disks and better performance during the boot. Because these systems are very different and have different capabilities, is impossible to convert virtual machines between generations.

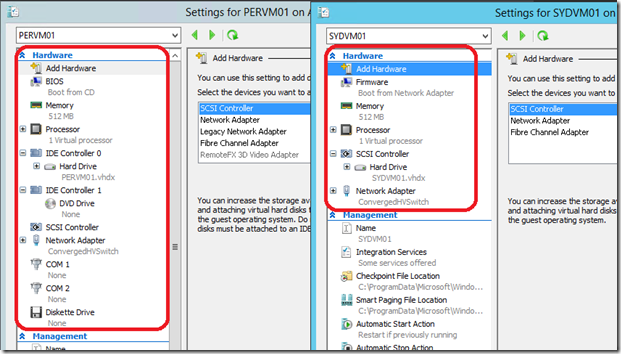
Another change was the removal of old legacy drivers like legacy network adapter, IDE controller, floppy controller, COM Ports and DMA controller. This bring a cleaner virtual machine configuration with less devices and a much better boot performance. DVD Devices are still available, but are not added by default. They can only be added through SCSI Controllers, which supports nows up to 256 DVD drivers per VM. It’s also important to mention that passthrough DVD hardware devices cannot be added in Generation 2 VMs, that means only DVD image files such as ISO can be used.

As example of these benefits, the next image shows the device manager console of a Generation 1 virtual machine on the left and the new generation on the right.

1485EN_02_10

Another good example of how easy a Generation 2 VM is to be managed and maintained is the VM settings window. The following screenshot shows a Generation 1 VM on the left side and the new generation on the left.

1485EN_02_11

On the other hand, Generation 2 VMs can be a problem for certain scenarios, given it only support specific Operating System versions and has no legacy devices.

To help you decide which version can be used in your environment, the following lists explain the benefits and limitations of Generation 2 VMs:

Benefits and Features:

  • · Replacement of BIOS with the new UEFI firmware
  • · Secure Boot
  • · More performance during boot process
  • · Boot Volume can have up to 64GB
  • · Boot disk can be configured as MBR or GPT disks
  • · DVD Drives attached to SCSI controllers supporting up to 256 DVD drivers per VM
  • · No more legacy devices such as Legacy Network Adapters, IDE Controller, Floppy Controller and COM ports
  • · Improvements in the keyboard controller, PS/2 Mouse, S3 Video, Programmable Interrupt Controller – PIC and Programmable Interrupt Timer – PIT

Limitations:

  • · Only support VHDX disks
  • · Does not support physical DVD Drive passthrough, only emulated devices using ISO or any other DVD image files
  • · Can use 64-bit editions of Windows 8, Windows Server 2012 or newer versions
  • · Does not support legacy devices such as Legacy Network Adapters, IDE Controller, Floppy Controller and COM ports

Whenever possible, the new generation will always be the best option because the new improvements and features that we don’t have in Generation 1, but for compatibility reasons, the default option when creating a new Virtual Machine is Generation 1.

Leandro Carvalho
My Blog | Technet Wiki Articles | MVP Profile
Twitter: LeandroEduardo | LinkedIn: Leandroesc

My Session at Teched Australia 2014

Speaking both

Hi guys.

I was invited this year again to be a speaker at Teched Australia 2014. I’ve been helping with small sessions like exam crams and Instructor-Led Labs since 2010 but this is the first time I’ve got a breakout session, looking forward to that.

The session topic is Hyper-V being administered and automated by PowerShell. Since the beginning of my journey in IT I’ve learned that IT-Pros and command lines, codes and programming are not a good combination, but I’ve also learned that that’s the only option we have out of the box to save time with automation and doing things quicker. The good news is that scripts and command lines became much easier since the first release of PowerShell. The guys that created it where thinking on how IT Pros could actually use commands in their day-to-day jobs so that’s what I’ll be covering. I’ll show and teach you how easy and simple is to use Powershell so that you can build your own scripts and commands to do most of the daily tasks.

Besides talking about the new PowerShell and Hyper-V features I’ll do some demos showing normal tasks that Hyper-V admins do in their job.

Here are the session information:

Hyper-V Session

Another exciting news is that for the first time Teched Australia has been split in two events. In Melbourne between October 7 & 8 and Sydney between October 27 & 28. My session is the only one covering Hyper-V in Sydney and I’ll also try to show you some news about the new Hyper-V and PowerShell in Windows 10 so don’t miss out.

Cheers.

Leandro Carvalho
My Blog | Technet Wiki Articles | MVP Profile
Twitter: LeandroEduardo | LinkedIn: Leandroesc
Cloud OS MVP Roadshow 2014

Hi there.

The Australia Cloud OS MVP Roadshow has been announced and it will be held in 2 cities this year: Sydney and Perth.

I’ll be presenting at the Sydney event on 18 Sept and we will be talking about the Cloud OS, Windows Server Migration and Windows Azure Pack:

MVP Roadshow

The event is totally free and you can use the links below to register:

Small black square PERTH Event Details & Registration: http://bit.ly/1kVcgzm

Small black square SYDNEY Event Details & Registration: http://bit.ly/1odJ2GX

Hope to see you all there.

Cheers.

Leandro Carvalho
My Blog | Technet Wiki Articles | MVP Profile
Twitter: LeandroEduardo | LinkedIn: Leandroesc

My Teched Australia 2013 Sessions

Image

Hi there.

Teched Australia is around the corner and it’s great to be presenting once again in such a great event.

This year we have lot’s of sessions covering products such as System Center 2012 R2, Windows Server 2012 R2, Windows 8.1 and much more. I can’t wait to see all great speakers showing all wonders of these releases and, most important, enjoy a sunny week in Gold Coast. =)

These are my 3 sessions this year, 1 exam cram and 2 Instructor-Led Labs.

Build Your Microsoft SharePoint Server 2013 Lab in the Cloud with Windows Azure

  • Speakers: Leandro Carvalho

Session Info

  • Day: Thursday
  • Time: 11:30 AM
  • Room: TLC – Theatre 1
  • Track: Technical Learning Centre
  • Session Type: Instructor-Led Lab (ILL)
  • Technical Level: 300

Leverage Windows Azure Virtual Machines and Virtual Networks to build your SharePoint 2013 server lab in the cloud! During this hands on lab, get a technical overview of Windows Azure virtual machines and virtual networks and then proceed to build a SharePoint 2013 cloud lab that you can leverage post-TechEd to extend your learning experience.

MCSE: Private Cloud – 70-246 and 70-247

  • Speakers: Leandro Carvalho

Session Info

  • Day: Thursday
  • Time: 1:45 PM
  • Room: Exam Cram
  • Track: Technical Learning Centre
  • Session Type: Exam Cram
  • Technical Level: 100

This Exam prep session focuses on what you need to know to get certified and pass the Private Cloud Microsoft Certified Professional exam 70-246 and exam 70-247. The presenter walks you through the objectives that are covered in the exam, and gives you some general exam taking tips and technology “gotchas” about Microsoft System Center 2012. This session will be your last step in getting ready for this exam.

Using the Microsoft Exchange Server 2013 Admin Centre

  • Speakers: Leandro Carvalho

Session Info

  • Day: Wednesday
  • Time: 5:00 PM
  • Room: TLC – Theatre 3
  • Track: Technical Learning Centre
  • Session Type: Instructor-Led Lab (ILL)
  • Technical Level: 300

During this lab, navigate through the Exchange Server 2013 Admin Centre (EAC). The new UX in the EAC is designed to help you complete tasks related to on-premises and online Exchange organisation management.


If you are attending Teched this year, don’t forget to come along to talk, share some experience and have some fun.

Leandro Carvalho 
My Blog | MSVirtualization (pt-BR) | Technet Wiki Articles | MVP Profile
Twitter: LeandroEduardo | LinkedIn: Leandroesc
New Book Available – System Center Virtual Machine Manager 2012 Cookbook by Alessandro Cardoso

Hey there!

As you might know, the new version of System Center Virtual Machine Manager 2012 comes with tons of new features and nice configurations that will change the way we manage not only our virtual environment, but the most important components of our datacenter.

To be prepared and learn almost everything about it from scratch, my friend Alessandro Cardoso has written a great book walking through the product. Check it out:

System Center Virtual Machine Manager 2012 Cookbook

SCVMM Cookbook 

What you will learn from this book

  • How to use VMM Architecture and plan for a real word deployment
  • Utilize Network Virtualization, Gateway integration, Storage integration, Resource Throttling, and Availability options
  • Deploy Operations Manager and integrate with VMM
  • Integrate SC APP Controller with VMM to manage Private and Public Clouds (Azure)
  • Cluster deployment with VMM Bare Metal
  • Create and deploy Virtual Machines from Templates
  • Deploy a highly available VMM Management Server
  • Manage Hyper-V, Vmware, and Citrix from VMM
  • How to upgrade from SCVMM 2008R2 to SCVMM 2012 SP1

In Detail

Microsoft System Center 2012 is a comprehensive IT infrastructure, virtualization, and cloud management platform. With System Center 2012, you can more easily and efficiently manage your applications and services across multiple hypervisors as well as across public and private cloud infrastructures to deliver flexible and cost-effective IT services for your business.

This cookbook covers architecture design and planning and is full of deployment tips, techniques, and solutions designed to show users how to improve VMM 2012 in a real world scenario. It will guide you to create, deploy, and manage your own Private Cloud with a mix of Hypervisors: Hyper-V, Vmware ESXi, and Citrix XenServer. It also includes the VMM 2012 SP1 features.

This book is a cookbook that covers architecture design, planning and is full of deployment tips, techniques and solutions designed to show users how to improve VMM 2012 in a real world scenario. It will guide you to create, deploy and manage your own Private Cloud with a mix of Hypervisors : Hyper-V, Vmware ESXi and Citrix XenServer.

To get you an idea of how good the book is, Alessandro made the chapter 6, Upgrading from SCVMM 2008 R2 SP1 to SCVMM 2012 for free.

The book is available at Amazon. Click here for more details.

Enjoy it.

Leandro Carvalho
Certified Ethical Hacker | MCSA+S+M| MCSE+S | MCTS | MCITP | MCBMSS | MCT | MVP Virtual Machine
My Blog | MSVirtualization (pt-BR) | Technet Wiki Articles | MVP Profile
Twitter: LeandroEduardo | LinkedIn: Leandroesc